How to Hang Gallery Walls Without Ruining Your Drywall
Creating a gallery wall is one of the easiest ways to make a home feel personal, stylish, and thoughtfully designed. A collection of photographs, artwork, mirrors, prints, certificates, or decorative objects can transform an empty wall into an eye-catching focal point. However, many homeowners hesitate to create gallery walls because they worry about damaging their drywall.
The good news is that you do not need to cover your walls with unnecessary holes to achieve a beautiful gallery wall. With careful planning, appropriate hanging hardware, accurate measurements, and a few simple techniques, you can install a gallery wall while keeping drywall damage to a minimum.
Whether you are decorating a living room, bedroom, hallway, staircase, office, dining area, or rental apartment, the right approach can make the process much easier. You can even plan the entire arrangement before putting a single hole in the wall.
This comprehensive guide explains how to hang a gallery wall without ruining your drywall. It covers planning, measuring, hardware selection, weight considerations, layout ideas, installation methods, renter-friendly solutions, common mistakes, repair techniques, and maintenance tips.
What Is a Gallery Wall?
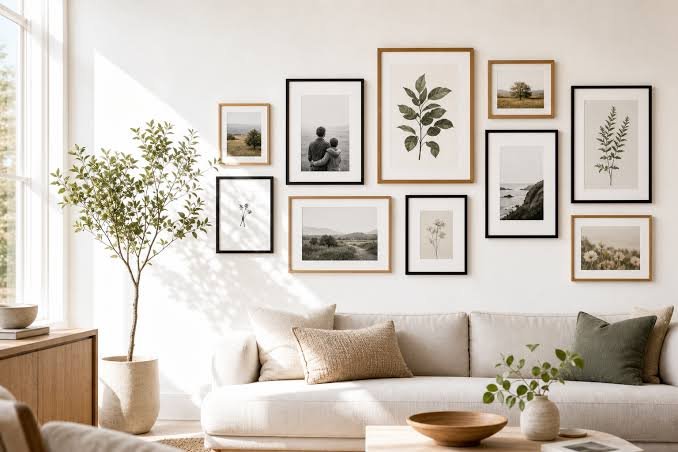
A gallery wall is a curated arrangement of multiple decorative pieces displayed together on one wall. Instead of hanging one large artwork, you combine several smaller or medium-sized items to create a unified visual display.
A gallery wall may include:
- Family photographs
- Art prints
- Paintings
- Posters
- Illustrations
- Mirrors
- Typography prints
- Travel photographs
- Children’s artwork
- Certificates
- Vintage frames
- Decorative plates
- Small textiles
- Botanical prints
- Personal memorabilia
- Sculptural wall objects
Gallery walls can be symmetrical or intentionally irregular. Some designs use matching frames, while others combine different colors, materials, and sizes.
The important thing is that the collection feels visually connected.
Why Drywall Requires Special Attention
Drywall is a popular wall-finishing material because it is relatively inexpensive, easy to install, and provides a smooth surface. However, drywall itself is not particularly strong when it comes to holding heavy objects.
The surface consists primarily of gypsum material covered with paper. If you drive a nail or screw into an unsupported section of drywall, the fastener may have limited holding power.
This creates several potential problems.
A heavy frame may:
- Pull the fastener out
- Create a larger hole
- Crack the drywall paper
- Leave a dent
- Cause the frame to fall
- Damage nearby artwork
- Create an unsightly wall repair
That does not mean you should avoid gallery walls. It simply means that you need to understand how your wall is constructed and choose hanging methods accordingly.
Start With a Gallery Wall Plan
The best way to avoid unnecessary drywall damage is to plan before installing anything.
Many people make the mistake of immediately picking up a hammer and starting to hang frames. Later, they realize that the spacing is wrong, the arrangement is too high, or one frame needs to move.
Every unnecessary adjustment creates another hole.
Instead, design the gallery wall first.
Think about:
- The number of pieces
- Frame sizes
- Frame colors
- Overall wall dimensions
- Spacing between frames
- Center point
- Furniture underneath
- Viewing height
- Weight of each item
- Hanging hardware
Planning can save both time and drywall.
Measure the Available Wall Space
Before choosing your arrangement, measure the wall.
Record:
- Total wall width
- Total wall height
- Furniture width below the wall
- Distance from furniture to ceiling
- Doors and windows nearby
- Light switches
- Electrical outlets
- Architectural features
If the gallery wall is going above a sofa, console, bed, or dining table, consider the furniture as part of the composition.
A gallery wall should usually relate visually to the furniture beneath it rather than appearing disconnected.
For example, a narrow gallery arrangement above a large sofa may feel undersized, while an oversized arrangement can overwhelm a small piece of furniture.
Choose the Center of Your Gallery Wall
The center of the composition is one of the most important elements.
Rather than measuring every frame from the ceiling, establish the approximate center of the entire gallery wall.
A common approach is to position the visual center around eye level. However, the ideal height depends on the room and furniture.
In a hallway, artwork may be positioned differently than in a living room.
When artwork is placed above furniture, leave enough breathing room between the furniture and the lowest frame.
The gallery wall should feel connected to the furniture without looking as though the artwork is sitting directly on top of it.
Use Paper Templates Before Making Holes
One of the best drywall-saving techniques is incredibly simple: use paper templates.
Take sheets of paper, newspaper, craft paper, or lightweight cardboard and create templates matching the size of each frame.
Mark the hanging point on each template.
Then attach the templates temporarily to the wall using removable painter’s tape.
This lets you see exactly how the arrangement will look before making holes.
You can move the templates around as many times as necessary.
No hammer.
No nails.
No drywall damage.
Why Paper Templates Work So Well
Paper templates provide a visual preview of your gallery wall.
They help you determine:
- Whether the arrangement is centered
- Whether the spacing feels balanced
- Whether frames are too close together
- Whether the composition is too high
- Whether the artwork is too large
- Whether the arrangement works with furniture
- Whether one piece dominates too much
This method is particularly useful for large gallery walls containing many frames.
Instead of making ten or fifteen holes while experimenting, you can adjust the templates until the layout feels right.
Create a Layout on the Floor
Another excellent technique is to arrange everything on the floor first.
Choose a clean area with enough space.
Place the frames on the floor exactly as you want them to appear on the wall.
Experiment with:
- Symmetrical layouts
- Grid layouts
- Organic arrangements
- Large center pieces
- Mixed frame sizes
- Horizontal compositions
- Vertical compositions
Take a photograph of the final arrangement.
You can use the photo as a reference while installing the pieces.
This approach greatly reduces guesswork.
Choose the Right Gallery Wall Style
There is no single correct gallery wall design.
Different arrangements work in different interiors.
1. Symmetrical Gallery Wall
A symmetrical arrangement uses similar frame sizes and consistent spacing.
This style works especially well in:
- Dining rooms
- Offices
- Formal living rooms
- Bedrooms
- Traditional interiors
It creates a clean and organized appearance.
2. Grid Gallery Wall
A grid layout uses rows and columns.
For example, you might use nine identical frames arranged in three rows of three.
The key is precision.
The horizontal and vertical spacing should remain consistent.
A grid can look professional and sophisticated, but small measurement errors may become noticeable.
3. Organic Gallery Wall
An organic arrangement uses different frame sizes and shapes.
The pieces are positioned according to visual balance rather than strict rows.
This style is more relaxed and personal.
It works particularly well with:
- Family photos
- Travel pictures
- Children’s artwork
- Vintage frames
- Mixed artwork
4. Centerpiece Gallery Wall
One larger artwork can serve as the anchor, surrounded by smaller pieces.
This approach is useful when you have one particularly important painting or photograph.
The large piece establishes the visual center while smaller frames create supporting interest.
Keep Spacing Consistent
Spacing can make or break a gallery wall.
You do not necessarily need identical spacing everywhere, but your spacing should feel intentional.
Many gallery walls look balanced when the gaps between pieces remain relatively consistent.
For example, you might choose a small gap between frames and repeat it throughout the composition.
The exact measurement matters less than consistency.
A gallery wall with random gaps can look accidental.
A gallery wall with deliberate spacing looks designed.
Understand the Weight of Your Artwork
Before selecting hanging hardware, determine how much each item weighs.
This is especially important for:
- Large mirrors
- Heavy wooden frames
- Glass-fronted artwork
- Oversized canvases
- Framed paintings
- Shelves
- Metal artwork
Small lightweight frames are much easier to hang than large heavy objects.
Do not assume that a standard nail can hold everything.
The hanging hardware should be appropriate for both the weight of the object and the wall construction.
Find the Wall Studs
One of the safest ways to hang heavier objects is to attach the hardware to a wall stud.
Studs are structural framing members located behind drywall.
A stud provides significantly more support than unsupported drywall.
You can locate studs using:
- A stud finder
- Wall measurements
- Existing outlets
- Switch locations
- Architectural clues
Studs are typically spaced at regular intervals, although construction varies.
If your gallery wall includes a particularly heavy centerpiece, positioning it near a stud can be beneficial.
When You Should Use a Stud
A stud is especially useful for:
- Heavy mirrors
- Large framed artwork
- Floating shelves
- Oversized decorative pieces
- Heavy wood frames
- Wall-mounted furniture
If you can place your strongest or heaviest piece at a stud location, you may be able to reduce the stress placed on drywall.
However, your gallery layout should still be based primarily on visual design.
You do not want to completely compromise the composition simply to align every frame with a stud.
Choosing the Right Hanging Hardware
There are several types of hardware designed for drywall.
Your choice depends on the weight of the object and whether a stud is available.
Common options include:
- Small picture hooks
- Picture-hanging strips
- Drywall anchors
- Screw-in anchors
- Hollow-wall anchors
- Toggle-style anchors
- Traditional nails
- Screws driven into studs
Always check the manufacturer’s stated weight rating and installation requirements.
Do not treat a weight rating as an invitation to hang an object at the absolute maximum capacity if you can avoid it.
A little extra capacity provides a margin of safety.
Picture-Hanging Hooks
Picture hooks can be useful for lightweight and medium-weight artwork.
They are designed specifically for hanging pictures and often create relatively small holes.
A properly installed picture hook can be preferable to simply hammering a large nail into drywall.
Choose a hook appropriate for the weight of the frame.
For heavier artwork, use a more secure anchoring method.
Drywall Anchors
Drywall anchors are designed to distribute weight over a larger area of drywall.
They can be helpful when there is no stud behind the desired hanging location.
Different types include:
- Plastic expansion anchors
- Threaded anchors
- Self-drilling anchors
- Hollow-wall anchors
- Toggle anchors
Each type has different installation requirements and weight capabilities.
Always follow the hardware manufacturer’s instructions.
Adhesive Picture-Hanging Strips
Adhesive hanging strips are popular for lightweight frames because they can eliminate traditional nail holes.
They are especially useful for:
- Small photographs
- Lightweight prints
- Small decorative frames
- Rental apartments
- Temporary displays
However, adhesive systems are not suitable for every wall, frame, or environment.
Their performance can be affected by:
- Frame weight
- Wall texture
- Dust
- Humidity
- Paint quality
- Temperature
- Installation technique
Always follow the manufacturer’s surface-preparation and weight instructions.
Why Adhesive Doesn’t Always Mean Damage-Free
Many people assume adhesive products can never damage paint.
That is not necessarily true.
If a strip is removed incorrectly, it can sometimes pull paint or even damage the drywall surface.
The safest approach is to follow the removal instructions exactly.
Never rip an adhesive strip directly outward from the wall if the product is designed to be removed by stretching.
Slow, controlled removal is generally much safer.
Avoid Hanging Heavy Objects With Weak Adhesive
A heavy mirror or large framed artwork should not automatically be placed on adhesive strips simply because you want to avoid drilling.
The weight, wall surface, and hardware must all be compatible.
If a heavy object falls, it can cause considerably more damage than a properly installed anchor.
Safety should come before avoiding a small hole.
Use Two Hanging Points for Heavy Frames
A common mistake is hanging a heavy frame from one small point.
Large frames can shift from side to side, and uneven weight distribution can place additional stress on the hardware.
Using two appropriate hanging points can improve stability.
It also helps the frame stay level.
For particularly heavy objects, use a suitable mounting system designed for the weight and wall construction.
Measure the Hanging Hardware
One of the easiest ways to create unnecessary holes is to measure only the frame size and forget about the hardware.
The hanging point may be:
- Above the frame’s center
- Below the top edge
- Offset from the sides
- Different on each frame
For accurate installation, measure the distance from the top of the frame to the hanging point.
Transfer that measurement to your wall template.
This prevents the common problem of placing a nail at the right height but discovering that the frame hangs too high or too low.
Use a Level
A level is one of the simplest tools you can use to improve the final appearance.
Even if your measurements are accurate, frames can look crooked.
Use a small level to check:
- Individual frames
- Horizontal rows
- Top edges
- Large centerpiece artwork
For a grid gallery wall, leveling is particularly important.
Small errors become increasingly obvious as more frames are added.
Create a Centerline
For many gallery walls, creating a temporary centerline is helpful.
You can use painter’s tape to mark:
- The horizontal center
- The vertical center
- Furniture center
- Major alignment points
These temporary marks provide a reference without permanently marking the wall.
Remove the tape carefully after installation.
Painter’s Tape as a Measurement Tool
Painter’s tape can do much more than protect surfaces.
You can use it to mark:
- Frame boundaries
- Center points
- Hanging points
- Spacing
- Alignment lines
Because painter’s tape is removable, it is a great planning tool.
However, always consider the condition of the painted surface and remove tape according to the tape manufacturer’s guidance.
Avoid Excessive Pencil Marks
You may be tempted to mark every measurement directly on the wall.
This can create a messy surface.
Instead, use:
- Painter’s tape
- Paper templates
- Light removable markings
- Measurement notes
The fewer permanent marks you make, the easier cleanup becomes.
Use a Gallery Wall Mockup
If you have access to a computer or smartphone, create a digital mockup.
Take a photograph of your wall and digitally place your artwork onto it.
This allows you to experiment with:
- Frame sizes
- Arrangement
- Colors
- Spacing
- Artwork combinations
A mockup is particularly useful before purchasing frames.
Choose Frames Before Hanging Anything
The frame is part of the design.
Consider whether your frames will be:
- Matching
- Similar but varied
- Completely mixed
- Black
- White
- Wood
- Metallic
- Vintage
- Minimalist
A gallery wall with mismatched frames can look beautiful when the differences feel intentional.
Create Visual Unity
Even an eclectic gallery wall needs some form of unity.
You can create unity through:
- Similar frame colors
- Repeated mat colors
- A consistent theme
- Similar photography styles
- Repeated accent colors
- Similar spacing
- One dominant frame finish
For example, ten completely different frames may feel chaotic if there is no connecting element.
But ten different frames containing black-and-white photography can still feel cohesive.
Consider the Color Palette
Color plays a major role in gallery wall design.
You can choose:
Neutral palette
Black, white, beige, cream, and natural wood create a calm look.
Colorful palette
Bright artwork can make a gallery wall energetic.
Monochrome palette
Black-and-white photographs create a timeless appearance.
Warm palette
Wood, beige, brown, terracotta, and muted colors can create a cozy atmosphere.
Choose colors that work with the existing room rather than treating the gallery wall as an isolated decoration.
Do Not Make Every Frame Perfectly Equal
A common beginner mistake is trying to make every piece identical.
Gallery walls often become more interesting when different sizes create visual movement.
You might combine:
- One large frame
- Three medium frames
- Several small frames
- One circular mirror
- A few decorative objects
The key is balance.
Different does not have to mean disorganized.
Start With the Largest Piece
When creating an organic gallery wall, begin with your largest artwork.
Place it near the visual center.
Then add medium-sized pieces around it.
Finally, fill remaining gaps with smaller pieces.
This makes the composition easier to control.
If you start with tiny pieces, you may create an arrangement that becomes difficult to balance when the large pieces are added.
Maintain Breathing Room
Do not fill every square inch of the wall.
Negative space is important.
A little empty space between frames helps individual pieces remain visible.
It also prevents the gallery wall from feeling overcrowded.
A gallery wall should be a collection, not a pile.
Think About Viewing Distance
The size of the spacing should relate to how far people will normally stand from the wall.
A hallway gallery wall is viewed from relatively close range.
A large living room wall may be viewed from farther away.
Very small frames can become difficult to appreciate from a distance.
Likewise, extremely tight spacing can make individual pieces visually merge.
Gallery Walls Above Sofas
A gallery wall above a sofa is one of the most common arrangements.
The composition should generally relate to the width of the sofa.
Avoid creating a tiny cluster floating above a very large sofa.
Instead, allow the gallery arrangement to visually occupy a meaningful portion of the furniture’s width.
Leave enough space between the artwork and sofa so people can sit comfortably without hitting the frames.
Gallery Walls Above Beds
Above a bed, safety becomes particularly important.
Avoid insecurely hanging heavy objects where they could fall onto someone sleeping below.
For heavier artwork, use appropriate structural mounting hardware and ensure that the installation method is suitable for the object.
Lightweight artwork can be a practical alternative if you want a softer installation.
Gallery Walls in Hallways
Hallways are excellent locations for family photos and travel photography.
Because hallways are narrow, a horizontal arrangement can work particularly well.
Keep the frames aligned and avoid allowing the display to interfere with doors or passageways.
Gallery Walls on Staircases
Staircase gallery walls require additional planning.
The artwork should generally follow the visual direction of the stairs.
You may need to create a diagonal composition.
Before drilling, use templates to understand how the arrangement will look along the slope.
Staircases also require extra attention to secure installation because artwork may be located above areas where people walk.
Gallery Walls in Small Rooms
A gallery wall can actually make a small room feel more personalized.
However, avoid overcrowding.
Use a limited number of pieces and allow enough wall space around the collection.
Light-colored frames can also create a visually lighter effect.
Renter-Friendly Gallery Wall Ideas
Renters often want gallery walls without permanent holes.
Several approaches can help.
Consider:
- Removable adhesive strips
- Lightweight frames
- Leaning artwork
- Picture ledges
- Freestanding displays
- Pegboards
- Tension-based systems where appropriate
Always check your rental agreement before modifying walls.
Leaning Gallery Wall
You do not always have to hang artwork.
Large frames can lean against a wall on:
- A console
- A shelf
- A dresser
- A fireplace mantel
- A floor
Layer smaller artwork in front of larger pieces.
This creates a relaxed gallery effect without drilling holes.
However, make sure the arrangement is stable and cannot easily tip over.
Use Picture Ledges
A picture ledge can provide another flexible solution.
Instead of individually fastening many frames to the wall, install one properly supported ledge and place multiple pieces on it.
This can reduce the number of permanent attachment points.
Picture ledges also make it easy to change artwork whenever you want.
For heavier ledges, use appropriate structural support.
Make a Gallery Wall With Fewer Holes
You do not necessarily need one wall attachment per frame.
Depending on the design, several pieces can be grouped around a properly supported central element.
For example, a strong picture ledge can hold several small frames.
Another approach is using a professional hanging rail system designed for multiple artworks.
These systems can be especially useful if you frequently change artwork.
Gallery Rails
Picture rails and hanging systems are useful in homes where artwork changes frequently.
Instead of making a new hole every time you replace a picture, you can adjust hanging cords or hooks.
This approach is common in galleries and can be adapted for residential interiors.
Use the Right Screwdriver and Drill Bit
If you need to install anchors, use the appropriate tools.
Depending on the anchor, you may need:
- Drill
- Drill bit
- Screwdriver
- Measuring tape
- Level
- Stud finder
Do not force hardware into the wall.
Follow the installation instructions provided with the anchor.
Do Not Over-Tighten Screws
Over-tightening can damage drywall.
If you are using an anchor, tighten it according to the manufacturer’s instructions.
The goal is secure attachment, not maximum force.
Over-tightening can cause the drywall around the anchor to crumble.
Be Careful Around Electrical Wiring
Before drilling, consider what may be behind the wall.
Electrical cables and plumbing can run through walls.
Avoid drilling blindly into areas where utilities may be present.
If you are uncertain about the wall’s construction or the location of utilities, use appropriate detection tools or consult a qualified professional.
Check the Wall Surface
Not all drywall is the same.
You may encounter:
- Painted drywall
- Textured drywall
- Freshly painted surfaces
- Older walls
- Patched areas
- Wallpaper over drywall
Adhesive products may perform differently depending on the surface.
For best results, follow product-specific instructions.
Avoid Weak or Damaged Areas
Do not install heavy hardware into visibly damaged drywall.
If the drywall is already:
- Cracked
- Soft
- Water-damaged
- Crumbling
- Loose
repair the area before installing heavy artwork.
A strong anchor cannot compensate for a structurally compromised wall surface.
How to Install a Small Gallery Wall
Here is a simple step-by-step process.
Step 1: Collect the artwork
Place all frames together.
Step 2: Measure each frame
Record height and width.
Step 3: Choose the layout
Arrange the pieces on the floor.
Step 4: Photograph the layout
Keep the image available during installation.
Step 5: Make paper templates
Create templates matching each frame.
Step 6: Tape the templates to the wall
Use removable painter’s tape.
Step 7: Check spacing
Stand back and inspect the arrangement.
Step 8: Locate studs
Identify structural support where needed.
Step 9: Choose hardware
Match the hardware to the weight.
Step 10: Install carefully
Make the minimum necessary holes.
Step 11: Check level
Adjust each piece.
Step 12: Remove templates
Take down the paper.
Step 13: Inspect the finished wall
Look at the gallery from different parts of the room.
How to Install a Large Gallery Wall
Large gallery walls require more planning.
Start by establishing the outer boundaries.
Imagine a large invisible rectangle around the entire arrangement.
Keep the composition within that boundary.
Then place the largest pieces first.
Add medium pieces.
Finally, use small frames to fill visual gaps.
This method prevents the arrangement from gradually drifting in one direction.
Common Gallery Wall Mistakes
Mistake 1: Hanging Everything Too High
Many people instinctively hang artwork too close to the ceiling.
This can make the furniture and gallery wall feel disconnected.
Consider the overall room rather than using the ceiling as your primary reference.
Mistake 2: Ignoring Furniture
Artwork should usually relate to nearby furniture.
A gallery wall that is centered on the wall but not centered over the sofa may look strange.
Mistake 3: Random Spacing
Inconsistent gaps can make a carefully selected collection look messy.
Use a repeatable spacing system.
Mistake 4: Using the Wrong Hardware
A small nail is not the solution for every frame.
Match hardware to weight and wall construction.
Mistake 5: Too Many Holes
Making adjustments after every frame is inefficient.
Templates solve this problem.
Mistake 6: No Level
A slightly crooked frame can be surprisingly noticeable.
Keep a level nearby.
Mistake 7: Ignoring Frame Weight
Glass, thick wood, and large frames can be much heavier than they appear.
Always consider actual weight.
What to Do If You Make a Wrong Hole
Even with careful planning, mistakes happen.
A small drywall hole is usually repairable.
For a small hole:
- Remove the hardware.
- Clean away loose material.
- Apply appropriate patching compound.
- Allow it to dry.
- Sand the repaired area smoothly.
- Apply matching paint.
For larger holes or damaged drywall, a more extensive repair may be necessary.
How to Make Drywall Repairs Less Noticeable
The repair should blend with the surrounding surface.
The biggest mistake is applying a huge amount of patching compound to a tiny hole.
Use only enough material to fill the damaged area.
Once dry, sand gently.
If the wall has texture, matching the surrounding texture may require additional work.
Paint color matching is also important.
Keep a Small Amount of Matching Paint
If you frequently change artwork, keeping leftover paint from the original wall can be useful.
Store it properly and label the room.
Then small repairs become much easier.
Gallery Wall Maintenance
Once your gallery wall is installed, inspect it occasionally.
Check for:
- Loose hardware
- Crooked frames
- Damaged cords
- Adhesive separation
- Loose anchors
- Cracks around mounting points
This is especially important for large or heavy artwork.
Seasonal Gallery Wall Changes
One advantage of a gallery wall is flexibility.
You can change artwork seasonally.
For example:
Spring:
- Botanical prints
- Nature photography
- Light colors
Summer:
- Travel photography
- Coastal artwork
- Bright prints
Autumn:
- Warm colors
- Landscape photography
- Earth tones
Winter:
- Minimal artwork
- Black-and-white photography
- Cozy typography
If you use a flexible hanging system, changing artwork can be easy.
Gallery Walls and Personal Memories
Some of the best gallery walls are not based entirely on professional artwork.
Family photos, postcards, travel memories, children’s drawings, and personal objects can make the wall more meaningful.
A gallery wall does not need to look like an art museum.
It should reflect the people who live in the home.
Mixing Photography and Artwork
Photography and artwork can work beautifully together.
For example, combine:
- Family photographs
- Botanical illustrations
- Abstract prints
- Architectural photography
- Typography
Use a repeated color or frame style to connect everything.
Mixing Mirrors With Artwork
Mirrors can add visual variety.
A small round mirror can break up the repeated rectangular shape of picture frames.
However, mirrors can be heavier than they look, so use appropriate mounting hardware.
Creating a Minimalist Gallery Wall
Minimalism does not mean having only one frame.
A minimalist gallery wall can use:
- Simple frames
- Limited colors
- Generous spacing
- Similar artwork
- Clean alignment
Avoid excessive decoration.
The goal is visual clarity.
Creating an Eclectic Gallery Wall
An eclectic gallery wall can include different:
- Frame colors
- Artwork styles
- Shapes
- Materials
- Sizes
To prevent chaos, maintain one or two connecting elements.
For example, use different artwork but keep all frames within a black-and-wood palette.
How to Make a Gallery Wall Look Expensive
You do not need expensive artwork to create a sophisticated display.
Focus on:
- Consistent spacing
- High-quality frames
- Proper alignment
- Balanced proportions
- Good lighting
- Thoughtful color selection
- Clean installation
A carefully planned inexpensive gallery wall can look more polished than an expensive collection installed randomly.
Lighting Your Gallery Wall
Lighting can significantly improve a gallery wall.
Consider:
- Picture lights
- Wall sconces
- Track lighting
- Ceiling spotlights
- Natural light
Avoid placing artwork where direct sunlight could damage sensitive prints or photographs over time.
Also consider glare if frames have glass.
Protect Artwork From Sunlight
Some artwork and photographs can fade with prolonged exposure to sunlight.
If your gallery wall receives strong direct sunlight, consider appropriate glazing or UV-protective options where suitable.
Curtains, blinds, or window treatments can also help control light exposure.
Gallery Walls in Home Offices
A gallery wall can make a home office feel more inspiring.
You might include:
- Motivational typography
- Professional certificates
- Photography
- Maps
- Illustrations
- Personal achievements
Keep the composition organized enough that it does not become visually distracting during work.
Gallery Walls in Dining Rooms
Dining rooms are ideal for symmetrical gallery walls.
A grid of botanical prints, black-and-white photographs, or artwork can create a sophisticated background.
Consider the table’s shape when choosing the gallery arrangement.
A rectangular table may work well with a horizontal composition.
Gallery Walls in Entryways
An entryway gallery wall creates an immediate impression.
Because entryways often have limited space, choose a compact arrangement.
A mirror can be especially useful because it provides both decorative and practical value.
Gallery Walls in Children’s Rooms
Children’s artwork can be displayed creatively.
Use lightweight frames and secure mounting methods.
Consider creating a flexible display where artwork can be changed as the child creates new pieces.
This can turn the wall into an evolving memory collection.
The Importance of Safety
A beautiful gallery wall should also be secure.
Do not sacrifice safety simply to avoid holes.
If an object is heavy, install it using an appropriate mounting system.
If the wall structure is uncertain, seek professional advice.
This is particularly important for:
- Large mirrors
- Heavy artwork
- Shelves
- Objects above beds
- Objects above seating areas
- Tall or unstable frames
A Simple Drywall-Friendly Tool Kit
You do not need a huge collection of tools.
A useful gallery-wall kit can include:
- Measuring tape
- Pencil
- Level
- Painter’s tape
- Stud finder
- Drill
- Screwdriver
- Appropriate anchors
- Picture hooks
- Paper
- Scissors
- Patching compound
- Fine sandpaper
- Matching paint
Having these items ready makes the installation process much smoother.
How to Plan a Gallery Wall in 30 Minutes
If you want a quick planning method, try this:
First 5 minutes
Measure the wall and furniture.
Next 10 minutes
Arrange the frames on the floor.
Next 5 minutes
Take photographs and adjust the composition.
Next 5 minutes
Create paper templates.
Final 5 minutes
Tape templates onto the wall and make final adjustments.
The actual hanging should begin only after you are satisfied with the layout.
The Best Way to Avoid Drywall Damage
The simplest principle is this:
Do not make permanent holes until you are certain about placement.
Use removable planning methods first.
Then select appropriate hardware.
Then install carefully.
Finally, avoid moving the artwork unnecessarily.
This simple process can dramatically reduce wall damage.
Frequently Asked Questions
Can I create a gallery wall without drilling?
Yes. Lightweight frames can sometimes be installed using removable adhesive hanging products or other renter-friendly systems. Always verify that the product is appropriate for the frame weight and wall surface.
Are nails safe for drywall?
Nails can work for lightweight pictures when used correctly. Heavier objects generally require stronger support.
Should heavy artwork be attached to a stud?
Whenever practical, attaching heavy objects to structural framing provides stronger support. If a stud is not available, use an appropriate drywall anchoring system.
How do I know where the studs are?
A stud finder is one of the easiest methods. You can also use construction clues, but electronic detection is generally more convenient.
How far apart should gallery wall frames be?
There is no universal number. Choose a spacing that feels balanced and repeat it consistently.
Should all gallery wall frames match?
No. Matching frames create a coordinated look, but mixed frames can create a more eclectic appearance.
Can I use adhesive strips on painted drywall?
Some adhesive products are designed for painted drywall, but compatibility depends on the specific product and surface. Follow the manufacturer’s instructions carefully.
How can I test the layout without making holes?
Use paper or cardboard templates attached with removable painter’s tape.
How do I fix a hole left by a nail?
Remove the nail, fill the hole with suitable patching compound, allow it to dry, sand it smooth, and touch up the paint.
Can a gallery wall damage drywall?
It can if inappropriate hardware is used, objects are too heavy, or mounting points are repeatedly moved. Proper planning and hardware selection can greatly reduce the risk.
Should I use one nail for every frame?
Not necessarily. The correct number of attachment points depends on the frame size, weight, hanging system, and hardware.
Is a picture ledge better for drywall?
A properly installed picture ledge can reduce the number of individual wall attachment points, but the ledge itself must be securely mounted and appropriately supported.
Final Tips for a Damage-Minimizing Gallery Wall
Before you start hammering or drilling, remember these principles:
- Plan the entire arrangement first.
- Measure the wall and furniture.
- Arrange frames on the floor.
- Create paper templates.
- Use painter’s tape for temporary positioning.
- Locate studs when appropriate.
- Match hardware to the object’s weight.
- Use drywall anchors when suitable.
- Never exceed hardware weight ratings.
- Use a level.
- Keep spacing intentional.
- Avoid unnecessary holes.
- Use adhesive products only when appropriate.
- Follow removal instructions for adhesive systems.
- Repair mistakes promptly.
- Check heavy artwork periodically.
- Keep safety more important than avoiding a small hole.
- Consider flexible hanging systems if you frequently change artwork.
Conclusion
A gallery wall can completely transform an ordinary room into a space that feels personal, artistic, and thoughtfully designed. The process does not have to mean covering your drywall with dozens of holes.
The key is preparation.
Start by measuring your wall, considering your furniture, selecting your artwork, and designing the arrangement before installation. Use paper templates to experiment with placement, painter’s tape to create temporary reference lines, and a level to keep everything straight.
Most importantly, select hanging hardware based on the actual weight of each piece and the construction of your wall. Lightweight artwork may work with suitable removable hanging products, while heavier objects may require anchors or attachment to structural framing.
Remember that the goal is not to eliminate every possible mark from the wall. The goal is to install your gallery wall safely, securely, and thoughtfully while minimizing unnecessary damage.
When you take the time to plan before making the first hole, you can create a gallery wall that looks professionally designed and remains practical for everyday life. Whether your style is minimalist, traditional, modern, eclectic, or completely personal, a carefully installed gallery wall can turn an empty drywall surface into one of the most meaningful features in your home.